===
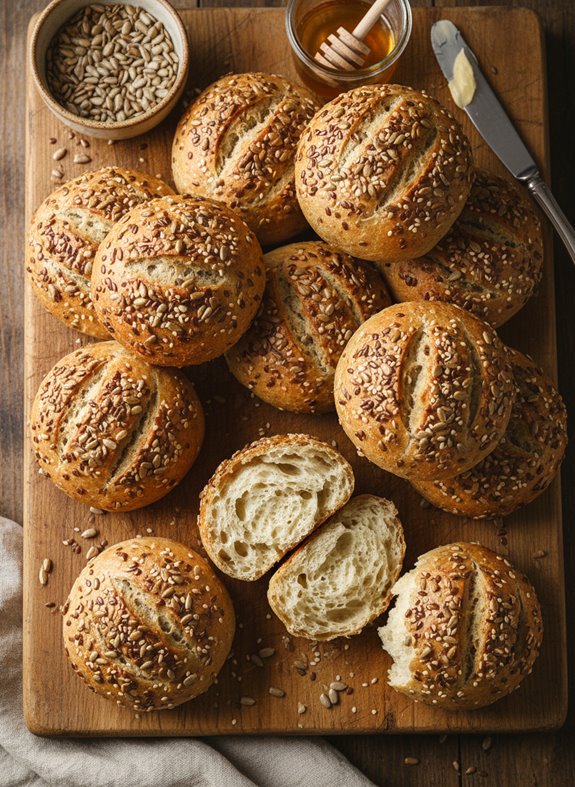
Why You’ll Love These Soft & Nutty Sunflower Seed Rolls
If you’re searching for a homemade bread that strikes the perfect balance between hearty and wholesome, these Sunflower Seed Rolls are about to become your new favorite.
I’m obsessed with how the nutty sunflower seeds complement the earthy rye flour, creating a texture that’s both substantial and tender.
What makes these rolls special? The combination of three different seeds—sunflower, sesame, and soaked flax—adds incredible nutrition while the touch of honey provides just enough sweetness.
They’re versatile enough for sandwiches or simply slathered with butter. And that crispy crust? Pure bread heaven.
What Ingredients are in Soft & Nutty Sunflower Seed Rolls?
These sunflower seed rolls combine the perfect balance of hearty flours, seeds, and just a touch of sweetness to create a bread that’s both nutritious and delicious.
I’m always amazed at how just a handful of simple ingredients can transform into something so satisfying. The blend of regular and rye flour gives these rolls their distinctive flavor profile, while the trio of seeds adds wonderful texture and nuttiness.
- 2½ cups all-purpose flour
- 1½ cups rye flour
- 2 teaspoons salt
- 3 teaspoons yeast
- 1 tablespoon honey
- 1⅔ cups water (divided)
- ½ cup sunflower seeds
- 4 tablespoons sesame seeds
- 4 tablespoons flax seeds (soaked overnight)
- Milk (for brushing tops)
When shopping for ingredients, quality matters. Look for fresh seeds if possible, as they’ll contribute more flavor to your rolls.
And don’t skip that overnight soak for the flax seeds—it’s essential for softening them and releasing their nutritional benefits. The rye flour might be found in the specialty baking section of your grocery store if you don’t spot it with the regular flours.
And while the recipe doesn’t specify, I recommend using active dry yeast, though instant would work with slight adjustments to the proofing step.
Wondering about substitutions? You could swap in different seeds based on what you have on hand, but the sunflower seeds are really the star here.
How to Make These Soft & Nutty Sunflower Seed Rolls
Making these sunflower seed rolls is honestly one of the most satisfying baking projects—nothing beats the smell of homemade bread wafting through the kitchen.
Start by combining 2½ cups of all-purpose flour, 1½ cups of rye flour, and 2 teaspoons of salt in a large bowl. In a separate small bowl, proof your 3 teaspoons of yeast by dissolving it with 1 tablespoon of honey in ¼ cup of warm water. Let this mixture sit until it becomes foamy and active, about 5-10 minutes. Once the yeast is bubbling away (always a magical moment, isn’t it?), add it to your flour mixture along with the remaining water from the 1⅔ cups total.
Now comes the therapeutic part—kneading the dough for a full 10 minutes until it’s smooth and elastic. The dough might seem a bit sticky at first, but resist adding too much extra flour. After achieving that perfect consistency, it’s time to fold in ½ cup of sunflower seeds, 4 tablespoons of sesame seeds, and those 4 tablespoons of flax seeds that you’ve thoughtfully soaked overnight.
Place your seeded dough in a greased bowl, cover it with a damp cloth, and let it rise until doubled in size. This usually takes about an hour, depending on how warm your kitchen is. Once risen, punch down the dough (my favorite stress-relieving step!) and shape it into 12 evenly sized buns.
For the final touches, brush the tops with water and place the rolls on a greased cookie sheet. Using a sharp knife, make shallow slices across the tops—this gives them that artisanal bakery look and helps them expand properly while baking.
Cover the rolls and let them rise once more until puffy, about 30-45 minutes. Before popping them into the oven, brush the tops with milk for a beautiful golden finish. Bake at 350 degrees Fahrenheit for approximately 30 minutes, or until they’re golden brown. Remember, if you prefer a crispier crust, you can increase the temperature slightly.
The rolls should sound hollow when tapped on the bottom when they’re done. Let them cool slightly on a wire rack before serving, though I rarely have the patience to wait that long!
Soft & Nutty Sunflower Seed Rolls Substitutions and Variations
While these classic sunflower seed rolls are absolutely delightful as-is, I love playing with different ingredient swaps to create exciting variations.
Try substituting pumpkin seeds for sunflower seeds, or go wild with a mix of your favorite nuts and seeds. Don’t have rye flour? All-purpose works fine in a pinch, though the flavor profile shifts a bit.
For a sweeter twist, I sometimes add dried cranberries or currants. The tanginess pairs beautifully with the nutty seeds.
You can also experiment with herbs—rosemary and thyme make these rolls perfect companions for soup night at my house, where they disappear faster than I can say “pass the butter.”
What to Serve with Soft & Nutty Sunflower Seed Rolls

Soft and nutty sunflower seed rolls pair beautifully with at least three different meal categories, making them versatile additions to your table.
I love serving these with hearty soups—think minestrone or beef stew—where they’re perfect for sopping up those last delicious drops. Can’t let that goodness go to waste, right?
They also complement any cheese board wonderfully. The nutty flavor plays against creamy brie or sharp cheddar in ways that still make me swoon.
For breakfast? Try splitting them, toasting lightly, and adding avocado or a soft-boiled egg. My Saturday morning go-to when I’m feeling fancy but not ambitious.
Final Thoughts

These sunflower seed rolls have become a staple in my kitchen, and I’m confident they’ll find a place in yours too.
There’s something magical about the combination of nutty sunflower seeds, hearty rye, and that perfectly crispy crust. The recipe is forgiving, even for baking newbies—trust me, I’ve had my share of bread disasters.
Remember to let the dough properly rise, knead in those seeds thoroughly, and don’t rush the baking process.
The aroma that fills your home? Worth every minute. These rolls freeze beautifully, so consider doubling the batch for future meals.

Silky Egg Drop Soup
Ingredients
Equipment
Method
- Bring chicken broth to a gentle boil in a medium saucepan.
- Season the broth with salt and white pepper, stirring to combine.
- While the broth heats, beat the eggs in a small bowl until well combined.
- Stir the chopped green onion into the beaten eggs.
- Once the broth reaches a rolling boil, reduce heat to a steady simmer.
- Pour the egg mixture slowly into the hot broth in a thin stream while constantly stirring with a fork in a circular motion.
- Allow the eggs to cook for about 10 seconds after all mixture is added, then immediately remove from heat.
- Ladle the soup into bowls and serve steaming hot.
Notes

Hearty Pasta E Fagioli
Ingredients
Equipment
Method
- In a large pot, brown the ground beef and Italian sausage (removed from casing) until fully cooked.
- Drain the cooked meat on paper towels to remove excess fat.
- In the same pot, add the diced onion, julienned carrots, chopped celery, and minced garlic. Sauté for about 10 minutes until vegetables have softened.
- Add the diced tomatoes, kidney beans, northern white beans, tomato juice, V8 vegetable juice, salt, oregano, basil, pepper, and thyme to the pot.
- Pour in the beef broth, add cayenne pepper to taste, and return the cooked meat to the pot.
- Allow the soup to simmer for about an hour, letting the flavors meld together. If the soup seems too thick, add more beef broth to reach your desired consistency.
- While the soup simmers, cook the ditali pasta according to package directions until al dente.
- Drain the pasta and stir it into the soup just before serving.
Notes

Cozy Smothered Chicken With Gravy
Ingredients
Equipment
Method
- Preheat oven to 350°F (175°C).
- Arrange chicken breasts in a baking dish, ensuring they aren't overcrowded.
- Season chicken with Ms. Dash seasoning, salt, and pepper.
- In a bowl, combine cream of mushroom soup and sour cream, stirring until smooth.
- Pour the creamy mixture evenly over the seasoned chicken breasts.
- Cover the dish with foil and bake for 45 minutes.
- While chicken is baking, prepare rice according to package directions.
- After 45 minutes, remove the dish from the oven and uncover it.
- Sprinkle French fried onion rings over the chicken and gravy.
- Return the uncovered dish to the oven for an additional 15 minutes, until onions are golden and chicken is cooked through.
- Serve each chicken breast over a portion of rice, spooning extra gravy over the top.
Notes

Hearty Oxtail Soup
Ingredients
Equipment
Method
- Preheat your oven to 425°F and lightly oil a roasting pan.
- Season the flour with salt and pepper. Dredge the oxtails in the seasoned flour and arrange them in the roasting pan.
- Roast the oxtails for about 15 minutes, then add the quartered yellow onions (with skin on), celery heart with leaves, and halved head of garlic to the pan.
- Spread tomato paste over the oxtails and continue roasting for about 40 minutes, stirring occasionally to prevent burning. This caramelization step is crucial for developing deep flavor.
- Transfer the roasted oxtails and vegetables to a large stockpot. Pour off excess grease from the roasting pan but preserve the caramelized bits.
- Add 2 cups of cold water to the hot roasting pan, scrape up all the flavorful brown bits, and add this liquid to your stockpot.
- Add the Beefamato juice (or tomato juice), remaining cold water, bay leaves, and beef base to the stockpot.
- Reduce oven temperature to 250°F. Place the covered stockpot in the oven and cook for about 3 hours, until the meat is falling off the bone.
- Strain the stock, reserving the oxtails. When cool enough to handle, remove the meat from the bones and set aside.
- Return the strained stock to the stovetop and bring to a low simmer.
- Add the chopped yellow onion, sliced mushrooms, celery ribs, carrots, spinach, diced tomatoes, and barley to the simmering stock.
- Simmer until the barley is tender, about 30 minutes.
- Return the reserved oxtail meat to the pot and heat through. Adjust seasoning with salt and pepper to taste.
- Serve hot with crusty bread. For even better flavor, refrigerate overnight and reheat the next day.
Notes

Baked Ziti
Ingredients
Equipment
Method
- Preheat your oven to 350°F (175°C).
- Cook the ziti pasta according to package directions, keeping it al dente since it will continue cooking in the oven. Drain when done.
- While pasta cooks, brown the Italian sausage in a skillet until fully cooked. Chop into bite-sized pieces if necessary.
- In a large mixing bowl, combine the ricotta cheese, egg, chopped parsley, 1½ cups of the shredded mozzarella, and Parmesan cheese.
- Add the cooked sausage and drained pasta to the cheese mixture, gently folding everything together.
- Pour in about ¾ of the pasta sauce and mix until everything is evenly coated.
- Transfer the mixture to a 2-quart casserole dish, spreading it out evenly.
- Top with the remaining pasta sauce and sprinkle the remaining ½ cup of mozzarella cheese over everything.
- Bake for 30-35 minutes until hot and bubbly with the cheese melted and golden on top.
Notes
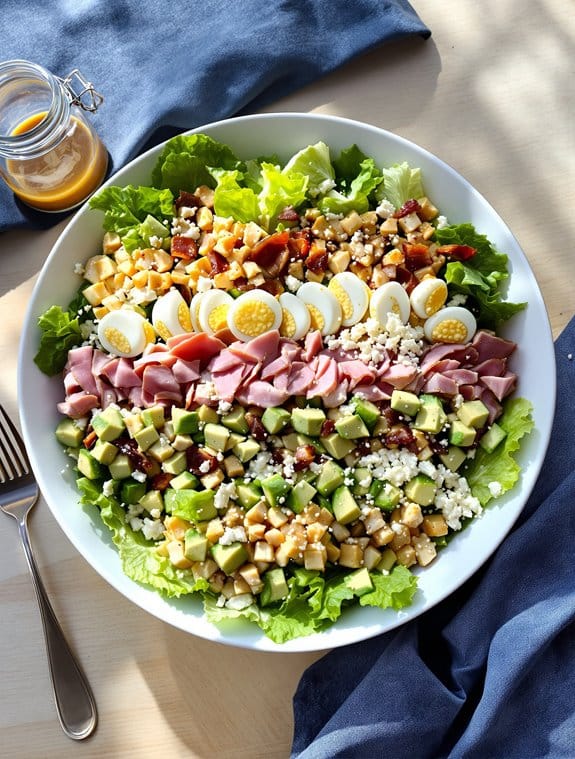
Restaurant-Style Cobb Salad
Ingredients
Equipment
Method
- Line six large salad bowls with fresh, crisp lettuce to create the foundation for your arrangement.
- Divide the diced turkey or chicken evenly among the six bowls, creating the first strip across each bowl.
- Create a parallel row with the diced ham, dividing it equally among all servings.
- Arrange the chopped hard-boiled eggs in another row across each bowl.
- Add the cooked, diced bacon in its own designated strip across each salad.
- Distribute the diced avocado evenly across all bowls in another row.
- Sprinkle the blue cheese, chopped green onion, and grated Monterey Jack cheese across the top of each salad.
- Serve with a variety of dressings on the side for guests to choose their preference.
Notes

Creamy Classic Swedish Meatballs
Ingredients
Equipment
Method
- In a large bowl, combine the ground beef, corn flake crumbs, minced onion, lightly beaten eggs, celery salt, and garlic powder. Mix thoroughly with your hands until the ingredients are well incorporated.
- Shape the mixture into 1-inch meatballs.
- Heat a large skillet over medium-high heat and brown the meatballs on all sides to develop a rich flavor.
- Transfer the browned meatballs to your slow cooker and add the sliced mushrooms.
- In a separate bowl, whisk together the cream of mushroom soup, evaporated milk, and Worcestershire sauce until smooth.
- Pour the creamy sauce over the meatballs in the slow cooker. Cover and cook on high for 1 hour.
- After 1 hour, reduce the heat to low and cook for an additional 3 hours, allowing the flavors to meld and intensify.
- Serve hot over buttered egg noodles for a classic presentation or let the dish cool completely and freeze for up to three months. Reheat thoroughly before serving.
Notes

Homemade Manicotti From Scratch
Ingredients
Equipment
Method
- In a mixing bowl, whisk together flour, water, 3 eggs, 1/2 teaspoon salt, and 1 tablespoon oil until completely smooth.
- Cover the batter and refrigerate for at least 30 minutes to allow the gluten to relax, which creates more tender crepes.
- While the batter rests, prepare the filling by combining ricotta cheese, shredded mozzarella, 1/2 cup Parmesan cheese, 1 egg, chopped parsley, a pinch of salt, and pepper in a large bowl. Mix thoroughly and set aside.
- Heat a 6-inch skillet over medium heat and lightly brush with oil.
- Pour about 1/3 cup of batter into the pan while simultaneously tilting and rotating it to create a thin, even layer covering the entire bottom. Pour any excess batter back into the bowl.
- Cook for approximately one minute until the edges brown slightly and begin to lift, then carefully flip with your fingers and cook the other side for 30 seconds.
- Stack finished crepes between sheets of wax paper as you continue making the rest of the crepes.
- Preheat oven to 350°F (175°C).
- Spread a thin layer of marinara sauce in a 13x9x2-inch baking dish.
- Place about 1/4 cup of cheese filling down the center of each crepe, roll it up, and arrange them seam-side down in the baking dish, nestling them close together.
- Once all manicotti are in the dish, spoon the remaining marinara sauce over the top and sprinkle with the remaining 1/2 cup of Parmesan cheese.
- Bake for 30 to 45 minutes until the dish is bubbling and heated through.
- Allow to rest for 5 minutes before serving.
Notes

Tender Italian Beef
Ingredients
Equipment
Method
- Preheat oven to 300°F.
- Place the beef chuck roast in a roasting pan.
- Sprinkle the Italian salad dressing mix over the roast.
- Add the drained pepperoncini peppers around the meat.
- Pour the beef broth and beer into the pan.
- Cover the roasting pan tightly with foil or a lid.
- Bake at 300°F for 4-5 hours, or until the beef shreds easily with a fork.
- When the meat is tender, shred it using two forks while it's still in the cooking liquid.
- Allow the shredded beef to rest in the juices for about an hour before serving.
- Serve on buns, using the cooking liquid as a dipping sauce if desired.
Notes

Graveyard Shakes
Ingredients
Equipment
Method
- Place glasses in the freezer for about 10 minutes before preparing the shakes for an extra-thick consistency.
- Add cookies & cream ice cream and milk to a blender.
- Blend until smooth and thick. Adjust milk quantity for desired thickness - less for thicker shakes, more for a more sippable consistency.
- Pour the milkshake mixture into 2 large glasses (or 3 smaller ones).
- Spoon a generous layer of crushed Oreos on top of each shake to create the "dirt" cemetery effect.
- Gently insert candy tombstones or decorated Milano cookies into the Oreo "dirt" layer, positioning them at slight angles for an authentic abandoned cemetery appearance.
- If desired, add optional toppings like whipped cream "fog", chocolate syrup drizzle, or gummy worms crawling out of the dirt.
- Serve immediately while cold and enjoy your spooky creation!