===
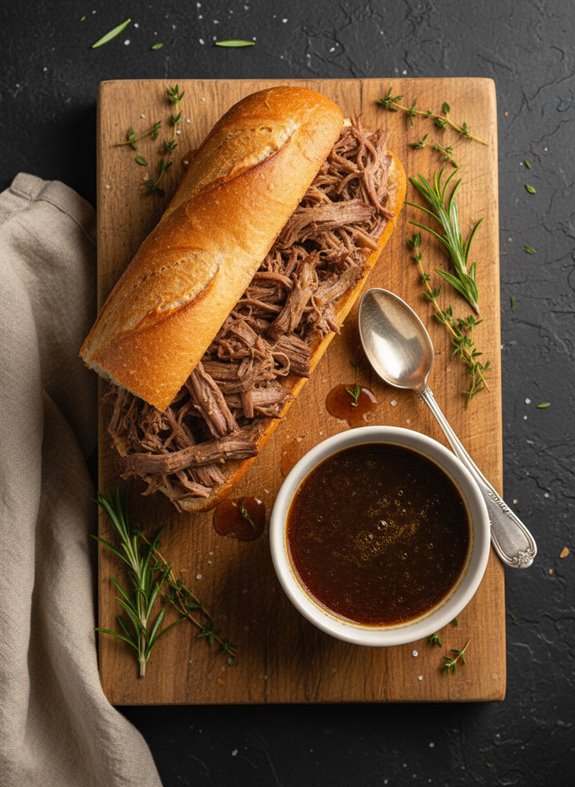
Why You’ll Love This Savory French Dip Sandwich with Au Jus
If you’ve ever craved a meal that’s both comforting and impressive, this French Dip sandwich is about to become your new obsession. I’m talking tender beef that falls apart at the touch, swimming in a rich, savory broth that’s perfect for dipping.
What makes this recipe special? It’s ridiculously simple yet delivers restaurant-quality results. The slow cooker does all the heavy lifting while you go about your day.
And that au jus? Pure magic. The combination of soy sauce and herbs creates a broth so flavorful you might be tempted to drink it straight—no judgment here.
What Ingredients are in Savory French Dip Sandwich with Au Jus?
Creating the perfect French Dip sandwich doesn’t require a complicated shopping list, which is part of its enduring appeal. The magic happens when simple, quality ingredients meld together during the slow cooking process. The beef becomes tender and infused with herbs while the cooking liquid transforms into that irresistible au jus we all crave for dipping.
Ready to gather what you need for this mouthwatering meal?
- 2 pounds beef roast
- 3 cups water
- 1 cup light soy sauce
- 1 teaspoon dried rosemary
- 1 teaspoon dried thyme
- 1 teaspoon garlic powder
- 1 bay leaf
- 3 peppercorns
- French rolls or baguette (for serving)
While the ingredient list is straightforward, there are a few things to reflect on for maximum flavor. For the beef, chuck roast works wonderfully, but you could also use rump roast or bottom round if that’s what’s available.
The quality of your soy sauce matters too—opt for a good light soy sauce rather than the dark variety, which might overpower the other flavors.
And those French rolls? They should be slightly crusty on the outside but soft inside to soak up that delicious au jus without falling apart. Might I suggest warming them slightly before assembling your sandwich?
Heaven on a plate, truly.
How to Make This Savory French Dip Sandwich with Au Jus
Making a French Dip sandwich couldn’t be simpler, and your slow cooker does most of the heavy lifting. Start by placing your 2 pounds of beef roast directly into the slow cooker—no browning necessary (though you certainly could for extra flavor). Pour in 3 cups of water and 1 cup of light soy sauce, creating the base for what’ll become your heavenly au jus.
Now for the aromatics: add 1 teaspoon dried rosemary, 1 teaspoon dried thyme, 1 teaspoon garlic powder, 1 bay leaf, and 3 peppercorns. These simple herbs and spices will transform your beef from ordinary to extraordinary as they slowly infuse throughout the cooking process.
Cover your slow cooker and set it to low for 5-6 hours. The magic of slow cooking means you can walk away and let time do the work—the meat will become so tender it practically falls apart when you look at it. Once the cooking time is complete, remove the meat from the broth and shred it using two forks. The beef should pull apart effortlessly, a sign that you’ve done everything right.
Meanwhile, strain the remaining liquid to remove the herbs and spices, then skim off any fat that’s risen to the top. What remains is your liquid gold: the au jus for dipping.
To assemble your French Dip sandwiches, warm your French rolls or baguette slices (a quick toast in the oven works wonders), then pile the shredded beef generously onto the bottom half. You might be tempted to add cheese or other toppings—and who am I to stand in your way?—but a classic French Dip lets the meat and that savory broth take center stage.
Serve each sandwich with a small bowl of the strained au jus alongside for dipping. The contrast between the slightly crisp bread exterior and the warm, juicy beef, followed by that extra flavor bomb when you dip into the broth? That’s what food dreams are made of, my friends.
Savory French Dip Sandwich with Au Jus Substitutions and Variations

While the classic French Dip sandwich recipe I’ve shared is downright delicious, who says you have to follow it to the letter?
I often swap beef roast with brisket or chuck for different flavors and textures.
Not a beef fan? Try pulled pork or even portobello mushrooms for a vegetarian twist.
The au jus can be customized too—add red wine for richness, beef broth instead of water, or throw in some onions while it simmers.
Sometimes I skip the rosemary and use Italian herbs instead.
And the bread, well, that’s your canvas. Ciabatta, sourdough, or even a crusty baguette work beautifully.
What to Serve with Savory French Dip Sandwich with Au Jus

A French dip sandwich practically begs for the perfect sidekick to round out your meal.
I love pairing mine with crispy potato chips or homemade french fries—something about that crunch against the tender beef just works.
A simple coleslaw adds freshness and cuts through the richness of the au jus, while pickles offer that tangy contrast we all crave.
For something heartier, try a cup of tomato soup or onion soup, which plays nicely with the beef flavors.
And don’t forget a cold beer or iced tea to wash it all down.
Trust me, these pairings take your sandwich from good to memorable.
Final Thoughts
Once you’ve mastered this French dip sandwich recipe, you’ll find yourself craving it on cold winter nights and busy weekday evenings alike.
The beauty of slow cooking is how it transforms an ordinary beef roast into something extraordinary with minimal effort.
I’ve served this at everything from casual family dinners to game day gatherings, and the pot is always scraped clean.
The rich au jus makes all the difference, doesn’t it? Those deep flavors developing over hours while you go about your day.

Korean Japchae: Silky Stir-Fried Noodles
Ingredients
Equipment
Method
- Soak dried shiitake mushrooms in warm water for several hours until soft and pliable. Once softened, squeeze out excess water and slice thinly.
- Boil the sweet potato noodles for about 3 minutes until soft but still slightly chewy. Drain and transfer to a large bowl.
- Cut the noodles into more manageable lengths using scissors. Toss with 1 tablespoon each of soy sauce and sesame oil to prevent sticking.
- Using the same pot of hot water, blanch the spinach for just 1 minute. Rinse in cold water three times to stop cooking and preserve color.
- Squeeze excess moisture from spinach, cut into 5cm pieces, and season with 1/2 tablespoon each of soy sauce and sesame oil.
- Heat a pan with a few drops of olive oil and stir-fry carrot matchsticks for 30 seconds. Remove and set aside.
- In the same pan, stir-fry sliced onion until translucent. Remove and set aside.
- Stir-fry the sliced white mushrooms until softened. Remove and set aside.
- Quickly stir-fry the green onions until slightly wilted. Remove and set aside.
- Stir-fry beef strips with prepared shiitake mushrooms until well-cooked. Add minced garlic, 1/2 tablespoon soy sauce, and 1/2 tablespoon sugar for the last 30 seconds of cooking.
- Combine all cooked ingredients in the large bowl with noodles. Season with remaining 2 tablespoons soy sauce, 2 tablespoons sesame oil, remaining sugar, and pepper.
- Mix thoroughly until all ingredients are well coated with the sauce. Sprinkle with toasted sesame seeds before serving.
Notes
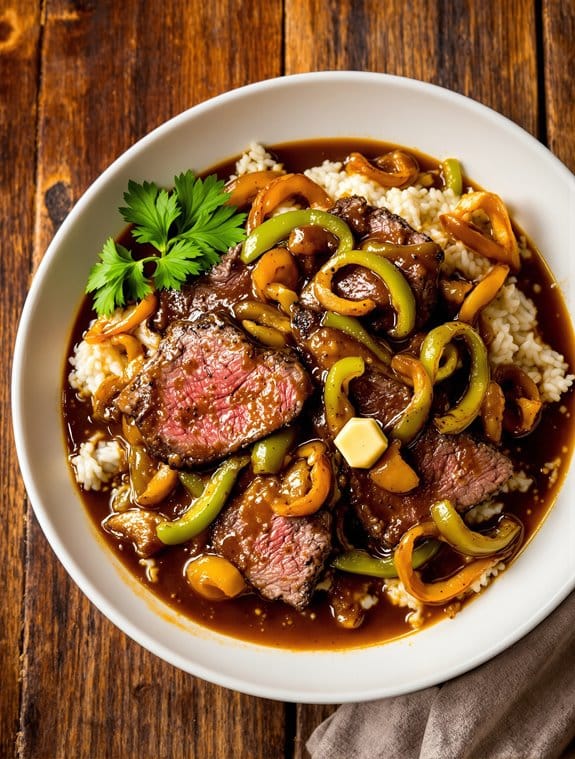
Tender Pepper Steak
Ingredients
Equipment
Method
- Preheat your oven to 350°F.
- Season the sirloin steak generously with salt and pepper on both sides.
- In a skillet over medium-high heat, melt the butter and add the sliced onion. Cook until onions begin to soften and become translucent.
- Add the seasoned steak to the pan and brown well on both sides. You're not cooking it through, just developing caramelization for flavor.
- Transfer the steak and onions to a baking dish, including some of the flavorful drippings.
- Arrange the sliced green pepper around the steak in the baking dish.
- Pour in the jar of beef gravy along with enough water to just barely cover the meat (approximately 1/2 to 1 cup).
- Cover the dish tightly with foil and place in the preheated oven for 2 hours.
- During the last 10-15 minutes of cooking, prepare a slurry by whisking together some flour and water until smooth.
- Remove the foil, stir in the flour slurry, and cover again to allow the sauce to thicken for the remaining cooking time.
- Serve the tender pepper steak over rice or egg noodles.
Notes

Parmesan Chicken Meatloaf
Ingredients
Equipment
Method
- Preheat your oven to 375°F. Prepare a 9×5-inch loaf pan by lightly greasing it or lining it with parchment paper for easy cleanup.
- In a large bowl, combine 1 1/2 pounds ground chicken, 1 cup breadcrumbs, 1/2 cup grated Parmesan cheese, 1 large egg, and 1/2 cup milk.
- Add 3 minced garlic cloves and 1 small finely chopped onion to the bowl. Then stir in 2 tablespoons fresh parsley (or 1 teaspoon dried), 1 teaspoon Italian seasoning, 1 teaspoon salt, and 1/2 teaspoon black pepper.
- Mix the ingredients gently until just combined. Avoid overmixing to keep the meatloaf tender.
- Transfer the mixture to your prepared loaf pan and gently press it into an even shape without packing it too tightly.
- Bake in the preheated oven for 40-45 minutes or until the internal temperature reaches about 165°F.
- For a cheesy, saucy finish, spread 1/2 cup marinara sauce over the meatloaf during the last few minutes of baking and then top with 1 cup shredded mozzarella cheese. Return the pan to the oven for an additional 5 minutes, just until the cheese is melted and bubbly.
- Remove the meatloaf from the oven and let it rest for about 10 minutes. This allows the juices to redistribute, ensuring moist, perfectly sliced servings.
Notes

Garlic Butter Shrimp Scampi Linguine
Ingredients
Equipment
Method
- Bring a large pot of salted water to a boil. Cook linguine until al dente, about 9-10 minutes. Before draining, reserve about 3/4 cup of the pasta water.
- While pasta cooks, heat 4 tablespoons butter, olive oil, red pepper flakes, and chopped garlic in a large skillet over medium-high heat until garlic becomes fragrant, about 1 minute.
- Add shrimp to the skillet, season with salt and pepper, and cook until just pink and cooked through, about 2-3 minutes. Be careful not to overcook.
- Transfer the cooked shrimp to a plate. Pour white wine into the same skillet, stirring to scrape up any browned bits from the bottom of the pan.
- Allow the wine to reduce and thicken for about 8-10 minutes.
- Return the shrimp to the skillet along with the cooked linguine and about 1/2 cup of reserved pasta water. Toss well to coat the pasta.
- Add the remaining 8 tablespoons of butter, chopped parsley, and lemon zest and juice. Toss to combine.
- If the sauce seems too thick, add more reserved pasta water. Cook for another 1-2 minutes until the sauce has thickened slightly and coats the pasta and shrimp.
- Serve immediately while hot.
Notes
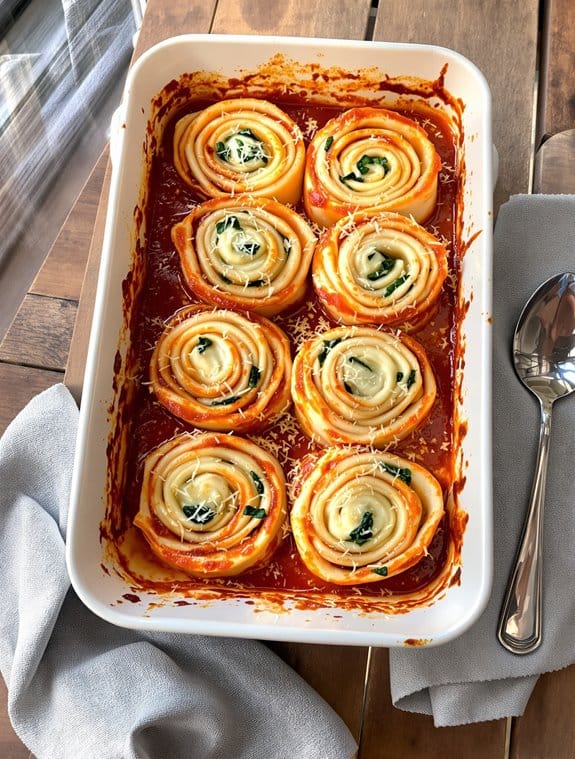
Lasagna Roll Ups
Ingredients
Equipment
Method
- Cook lasagna noodles for 2-5 minutes less than package directions (slightly underdone). This makes them easier to handle without tearing while still allowing them to finish cooking in the oven.
- While noodles are cooling, prepare the cheese filling. In a large bowl, combine mozzarella cheese, ricotta cheese, a generous sprinkle of Parmesan cheese, thawed and thoroughly squeezed dry spinach, and the egg. Mix until well combined.
- Lightly coat the bottom of a 13x9 inch baking dish with spaghetti sauce.
- Lay out lasagna noodles one by one. Spread a portion of the cheese mixture evenly across each noodle, then add a spoonful of spaghetti sauce.
- Carefully roll up each noodle and place seam-side down in the prepared baking dish.
- Once all rolls are arranged, top with additional spaghetti sauce and a final sprinkle of Parmesan cheese.
- Bake in a preheated 350°F oven until cheese is melted and bubbly, about 30 minutes.
Notes

Double-Boiler Scrambled Eggs
Ingredients
Equipment
Method
- Fill the bottom of a heavy saucepan with 1-2 inches of water and bring to a gentle simmer (not boiling).
- In a small mixing bowl, crack the eggs and add the heavy cream and kosher salt. Whisk with a fork until just combined, without overbeating.
- Place your stainless mixing bowl or double boiler top over the simmering water. Add the butter and swirl until completely melted.
- Pour in the egg mixture. If the eggs start cooking immediately at the edges, your heat is too high - adjust accordingly.
- As curds begin to form from the bottom, gently lift them to the top with a spoon or spatula, allowing uncooked egg to flow underneath.
- Continue with a lifting and folding motion rather than stirring. When the eggs are almost set but still look slightly wet, remove from heat immediately.
- For smaller curds, lightly chop the eggs and give them a gentle stir.
- Sprinkle with the fresh herbs and serve immediately on a warm plate.
Notes
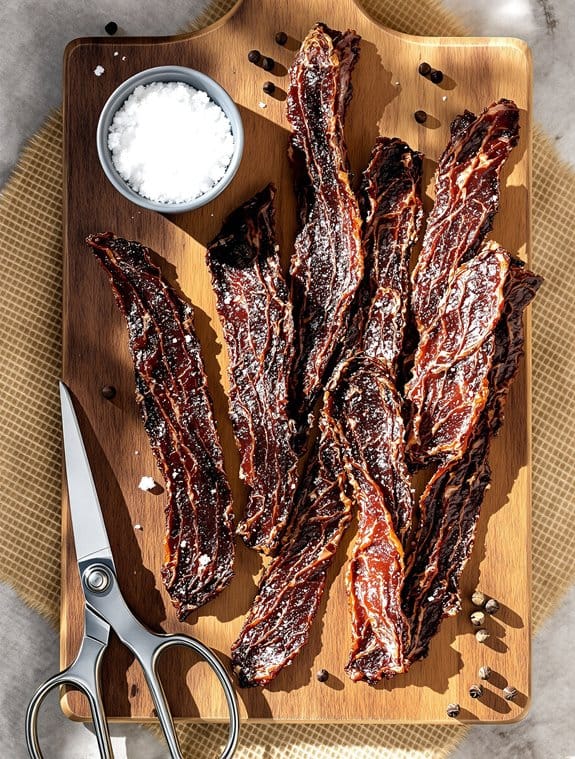
Homemade Beef Jerky
Ingredients
Equipment
Method
- Wrap the trimmed beef in plastic wrap and freeze for about 2 hours until it's almost solid but not completely frozen.
- Remove the semi-frozen meat from the freezer and slice it with the grain into 1/8-inch thick pieces.
- Arrange the sliced beef in a shallow dish for marinating.
- In a saucepan, combine the soy sauce, dry sherry, stock, rice wine vinegar, brown sugar, ginger, garlic, and black pepper.
- Bring the marinade mixture to a boil, then allow it to cool completely.
- Pour the cooled marinade over the sliced meat and refrigerate overnight, stirring once or twice to ensure even flavor distribution.
- Preheat your oven to 250°F and line the bottom with foil to catch any drips.
- Pat the marinated meat dry with paper towels.
- Arrange the meat slices in a single layer on a roasting rack, ensuring they don't overlap.
- Place the rack in the preheated oven, then immediately reduce the heat to 150°F.
- Let the meat dry slowly for about 8 hours, or until the jerky is stiff but still bendable.
- Once fully dried, store your homemade jerky in an airtight container in the refrigerator.
Notes
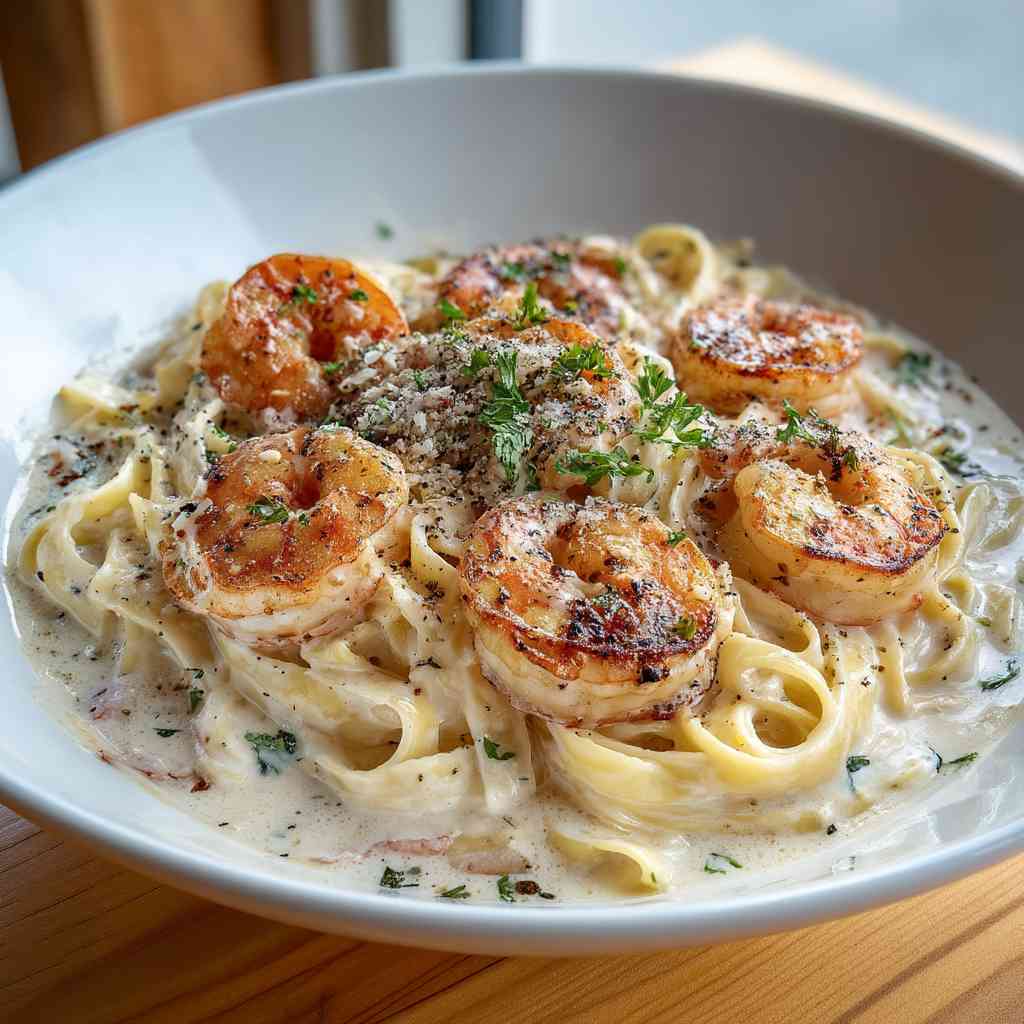
Creamy Garlic Shrimp Pasta
Ingredients
Equipment
Method
- Bring a large pot of generously salted water to a rolling boil. Add the pasta and cook according to the package directions until al dente, reserving about ½ cup of the starchy pasta water before draining.
- While the pasta cooks, heat olive oil in a large skillet over medium heat. Add the shrimp in a single layer, season with salt and black pepper, and cook for 1-2 minutes per side until they turn pink and opaque. Transfer the shrimp to a plate to prevent overcooking.
- In the same skillet, add the minced garlic and sauté for about 30 seconds until fragrant.
- Pour in the heavy cream and vegetable broth (or reserved pasta water). Stir in the freshly grated Parmesan cheese, Italian seasoning, and red pepper flakes. Allow the sauce to thicken slightly.
- Return the shrimp to the skillet and add the drained pasta. Toss everything together until each strand is evenly coated with the velvety sauce. If the sauce is too thick, add a splash of additional pasta water and adjust the seasoning with salt and black pepper as needed.
- Transfer the pasta to serving plates or a large pasta bowl. Garnish with chopped fresh parsley and serve immediately while hot.
Notes
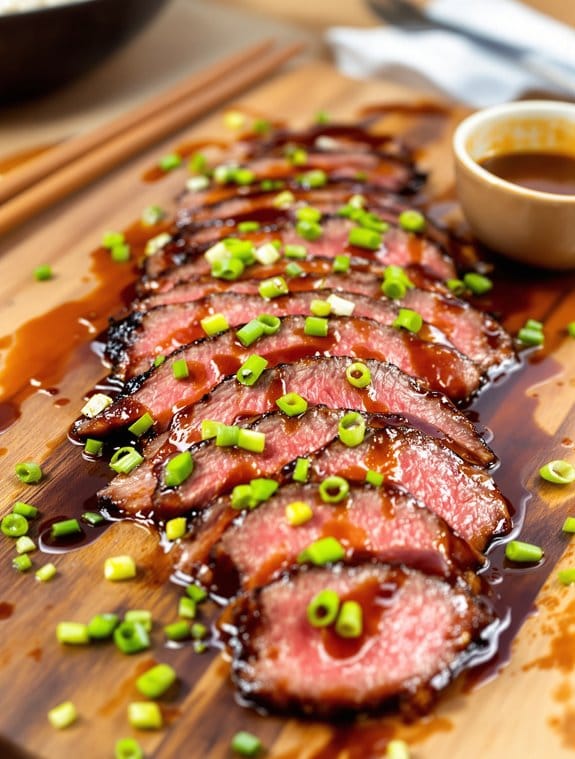
Honey Soy Glazed Flank Steak
Ingredients
Equipment
Method
- In a large resealable plastic bag, combine reduced sodium soy sauce, canola oil, honey, water, chopped scallions, and finely chopped garlic cloves.
- Add the flank steak to the bag, seal it tightly while squeezing out excess air, and refrigerate for at least 2 hours (overnight is ideal for maximum flavor).
- When ready to cook, remove the steak from the marinade. Reserve the marinade and transfer it to a small saucepan.
- Grill or broil the steak, turning once, until it reaches your preferred doneness. For medium, cook about 4-5 minutes per side, depending on thickness.
- While the steak is cooking, bring the reserved marinade to a boil, then reduce heat to low and simmer for 5 minutes to create a glaze.
- Let the steak rest for 5 minutes, then slice thinly across the grain.
- Drizzle the reduced marinade glaze over the sliced steak before serving.
Notes

3-Ingredient Pan-Fried Halloumi
Ingredients
Equipment
Method
- Pat the halloumi slices dry with paper towels to remove any excess moisture.
- Heat the olive oil in a non-stick skillet over medium heat until it shimmers.
- Arrange the halloumi slices in a single layer in the skillet and cook undisturbed for about 2-3 minutes on the first side until a golden-brown crust forms.
- Flip the slices and sprinkle with the dried oregano or fresh thyme. Continue cooking for another 2-3 minutes until the other side is equally golden and crispy.
- Transfer the halloumi to a plate and serve immediately while it's warm and crispy.